Git for Absolute Beginner's

Introduction
Back in day’s when I started learning web development, after learning HTML, CSS and Javascript I learnt Git to manage and save my codes somewhere on the server i.e GitHub. At that time I was unaware of the true potential of the Git I thought it just for saving the code and tracking the changes.
In this blog I will let you know the basic concepts, terminologies and commands of Git that will help or give the starting point to learn Git.
Mastering Git: The Developer's Time Machine
In modern software development, coding is rarely a solo journey. Whether you are building a personal project or working in a large team, managing changes is critical. That is where Git comes in.
What is Git?
Git is a Distributed Version Control System.
Version Control: It tracks every change you make to your code. If something breaks, you can "travel back in time" to a previous working version.
Distributed: Every developer has a full copy of the project history on their local machine, not just on a central server. This makes it fast and reliable.
Core Terminologies
Before jumping into commands, let’s define the mental model of Git:
Repository (Repo): A folder where Git tracks all the files and their history.
Commit: A "snapshot" of your changes. Think of it as a save point in a video game.
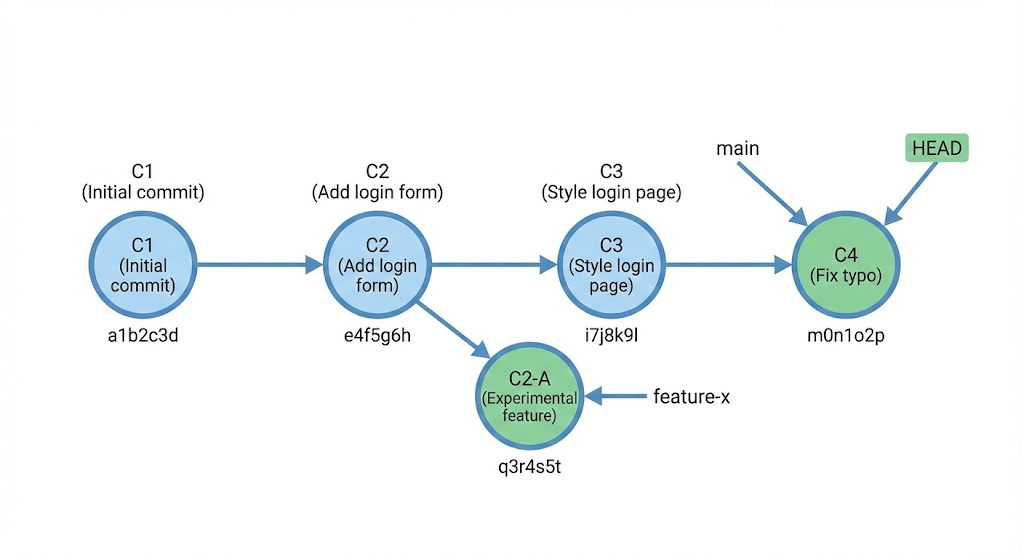
Branch: A parallel version of your repository. The default branch is usually called
mainormaster.HEAD: A pointer that indicates which branch and commit you are currently working on.
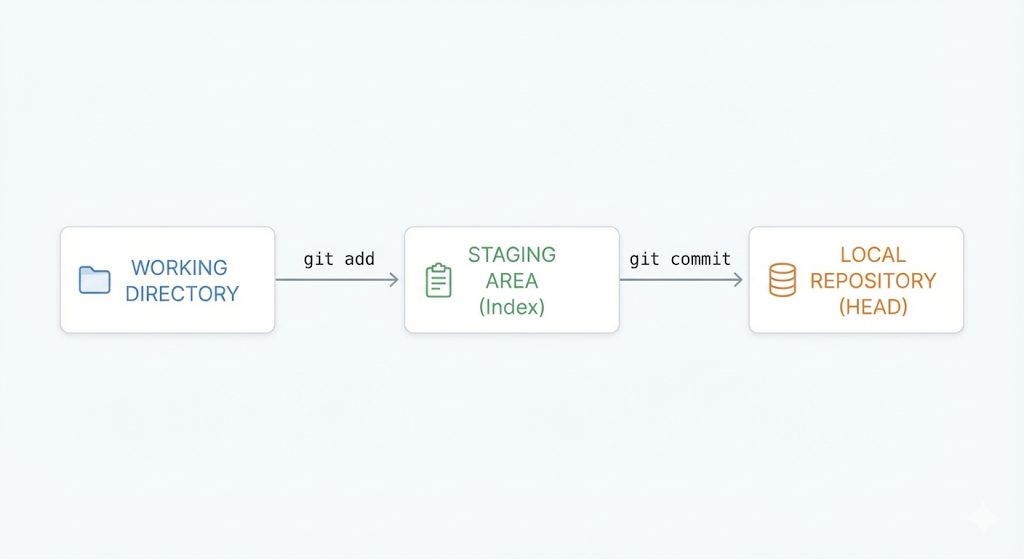
Staging Area (Index): A middle ground where you prepare changes before officially "committing" them.
Common Git Commands & Basic Workflow
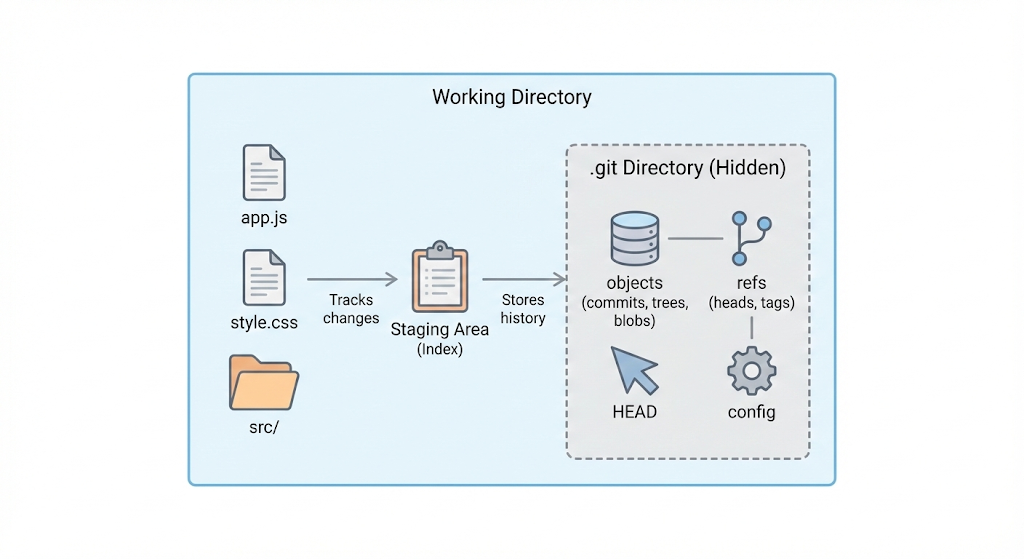
When you hit the command git init it creates a .git/ folder which is the brain of the Git that tracks changes on your code files, but Git doesn’t want that you should touch the .git folder so it gives you commands to control the power of Git. So let’s get started with learning the commands.
1. Initialize a Project
Navigate to your project folder in the terminal and run:
git init
This creates a hidden .git folder, signaling that Git is now tracking this directory.
2. Check the Status
To see which files have been modified or are untracked:
git status
3. The "Stage and Commit" Cycle
When you finish a task (like adding a new React component), you follow these steps:
Step A: Add to Staging
    git add filename.js   # Adds a specific file
    git add .             # Adds all changed files
Step B: Commit with a Message
git commit -m "Add Navbar component with responsive design"
4. View History
To see the timeline of all your commits:
git log
5. View a compact version (Recommended):
git log --oneline
This gives you a clean, condensed list of your project's history.
6. Compare working directory with the last commit:
git diff                      # Unstaged changes
git diff --staged             # Staged changes
git diff commit1 commit2
Use it before committing to see exactly what you changed.
Revert Git Commit
1.Revert git add
git reset . => to all files
git reset <filename> => for specific file
undo git add and discard changes
2. Undo and Keep Your Changes (Most Common)
If you committed too early and want to continue working on the code, use a Soft Reset. This removes the commit but keeps your changes "staged" (green in git status).
git reset --soft HEAD~1
3. Undo and Unstage Your Changes
If you want to undo the commit and also unstage the files (make them red in git status), use a Mixed Reset (this is the default).
git reset HEAD~1
4. Undo and Delete Everything (DANGEROUS)
If you want to completely destroy the last commit and all the code changes associated with it, use a Hard Reset.
Warning: You cannot recover these changes easily once they are deleted.
git reset --hard HEAD~1
| Command | Status of your code | Best used for... |
--soft | Kept & Staged | Fixing a commit message or adding one more file. |
--mixed | Kept & Unstaged | Redoing the work or breaking one big commit into two. |
--hard | Deleted | Throwing away a "failed experiment" entirely. |
A Real-World Developer Workflow
Imagine you are adding a login feature to your MERN app. Here is how you would use Git professionally:
Create a New Branch: Always keep your
mainbranch clean and deployable.Bash
git checkout -b feature-loginWork on Your Code: Edit your files and test the login logic.
Stage and Commit:
  git add .
  git commit -m "Implement JWT login logic"
Merge Back to Main: Once the feature is tested, switch back and merge.
git checkout main
git merge feature-login
Final Thoughts: Git is Your Safety Net
Git might feel overwhelming at first with its many commands and branching logic, but remember: every expert was once a beginner. As a developer, Git is more than just a tool for saving code—it is your safety net. It gives you the freedom to experiment, the ability to collaborate with developers worldwide, and the confidence to know that no mistake is truly permanent.
Key Takeaways to Remember:
Commit Often: Small, frequent commits make debugging much easier.
Branch for Features: Never work directly on
mainif you’re building something new.Pull Before You Push: Always stay in sync with your team to avoid messy merge conflicts.
The best way to master Git is through consistent practice. Start by using it for your small projects, and soon these commands will become muscle memory.


